We are selling our
Additionally, you can follow the history of her build by watching the Skoolie Demolition playlist and Skoolie Finishings playlist on our vlog. We have a vlog & blog detailing the reasons why we decided to build a
Skoolie video tour
In summer 2021, we make a vertical format
How to Buy our Skoolie
Price
$65,000
Contract
If a buyer wishes to purchase the HildeBus, the seller and buyer will sign a contract detailing the terms of the sale and transfer of the
The buyer is responsible to transfer the title and registration at her own DMV, and transferring insurance to her name (or choosing a different provider). The seller will cancel insurance on the day of sale since they are no longer owners of the vehicle.
Down-payment
To secure interest, a non-refundable security deposit is needed of 10% of the purchase price from the buyer.
Payment
The buyer is responsible to obtain funding, whether that be cash or private loan. Wire payments are the preferred method of payment transfer due to simplicity.
How to Reach Us
If you would like to reach us about touring our
History of the HildeBus
We purchased our retired school bus at government auction from a school district in Tennessee at the end of September 2020. We started demolition of the interior in October 2020 and officially hit the road in May 2021.
Eric (husband) did the majority of the demolition and build by himself with no construction background – we were fortunate to have help of many friends, family and neighbors who had expertise in construction, carpentry, painting, and electrical. Truly, we may not have finished this project at times without the help of others, and we appreciate that more than they may ever know.
Build safety
Build safety and quality were important to us since our family of five would be living on board full-time. Eric hired several professions to inspect the major systems at both the rough-in and finishing stages to ensure safety for our family.
Eric adhered to RV build code as much as possible, since the code was set in place by industry professionals.
The major systems that he built were:
- Plumbing
- Electrical
- Solar
- A/C
- Liquid Propane
Read this blog if you want to know more about buying a used school bus for a
Features and Upgrades of our skoolie
Her features and upgrades will be categorized according to 5 main points: plumbing, electrical & solar, propane, AC, mechanical and then a general category (framing, paint, etc).
Any framing and products installed were done between December 2020 to May 2021, and only put into full-time service during May 2021 to October 2021. This build is lightly used.
Plumbing
We ran flexible CPVC (pex) piping for our cold and hot water lines. We ran white PVC flexible pipe for our waste water lines (from kitchen sink and bathroom areas, including urine diverter at toilet). Eric hired a licensed plumber to inspect this system at rough-in and final. No leaks were found or have since occured.
We purchased two 100-gallon tanks: one for fresh water and one for gray water. The gray water tank is mounted underneath our bus (read the gray water tank blog here). The fresh water tank, pump, and accumulator is located under our bed in the rear bedroom or captains quarters (read the fresh water tank blog).
The on-demand water heater is also installed in the rear bedroom. Read that water heater blog.
Read about how we built out and waterproofed our shower here in this blog.
In the cabinet holding the pump and accumulator, there is also a manual release valve for the fresh water tank, which release under the bus. To access this area, you’ll need to remove the screws to the panel.
To fill the fresh water tank, we have inlets installed on the right rear exterior.
We have 2 water filtration systems:
- Before water enters the fresh water tank, with an in-line filter
- At the kitchen sink, to filter drinking water
Electrical and solar
12V
We optimized our build to run predominantly on a 30 amp 12V system for lighting and fans, since that is the power produced directly from solar energy.
We used a marine grade wire, made for specific use in mobile or moving application.
Items running on 12V:
- LED puck lights in ceiling (on dimmer switches)
- LED lights in bunks
- 12V Retro-inspired fridge by Unique appliances (made for mobile application)
- Two ceiling vent fans (living room and bunk cabin)
110V
We ran 110V wiring for those normal kitchen appliances or plugging in a computer, for example. These outlets are located primarily in the living room and kitchen. The 110V outlets are tamper resistant and two offer USB-C and USB-A charging capability.
Solar
We installed the following:
- Six 205 watt mono crystalline solar panel to the roof using brackets that can be adjusted if needed
- Victron 3000 inverter/charger
- BMV 700
- Alternator charger equipment (not installed but included)
- Four 100 amp hour Battle Born batteries
- Charge monitor (installed in bunk bed corridor on wall)
Generators
We purchased two 750 watt gas generators from Harbor Freight in June 2021. We run them in tandem to power our AC when we are not tied in to the grid.
These are included in the sale.
Liquid Propane
In May 2021, Eric ran black pipe for our liquid propane (LP) system and tested for leaks at all connection points. The entry into the bus begins in the exterior under-mount storage bin located under the cabinets near the kitchen sink & range.
We only have LP lines running along the right side of the bus, which is where the appliances are located that need this service.
We carry two 20 pound propane tanks in the under-mount storage bin, and that lasts our family of five about 3 months before needing to be refilled.
Appliances using liquid propane gas:
- Dickinson Marine Heater in living room
- Unique off-grid range (oven, convection oven & cooktop) in kitchen
- On-demand, ventless hot water heater (read that blog) in captain’s quarters [aka. rear bedroom]
Air conditioning
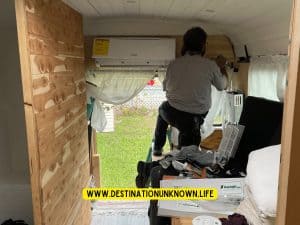
The compressor is mounted underneath the bus with a screen to limit debris. The air handler is mounted in the rear of the bus in the captain’s quarters.
A licensed HVAC technician in Cutler Bay, Miami connected our mini-split air condition system.
Mechanical & Service History
Prior to the purchase of the bus (September 2020), we had a mechanical inspection performed, and relied on the service reports from the school system. Immediately after the purchase in Tennessee, Eric took the bus to a second mechanic at the bus manufacture (Thomas Built Buses).
In April 2021, a mobile mechanic performed an oil change and mechanical inspection.
In June 2021, we had our rear air brakes and one new rear tire installed in Cutler Bay, Miami by a mobile mechanic.
In August 2021, we had engine maintenance done in Worcester, Massachusetts. They fixed a radiator leak then.
General
Bus specifications
- Length: 37 foot; Width: 8.5″ with side mirrors pushed in
- Exterior Height: between 10 to 11 feet
- Interior Height: 6.5 feet in the center
- Engine: Cummins 5.9L
- Transmission: Allison 2000
- Mileage: ~215,000 miles
- Weight: ~25,000 pounds
Title & Insurance
The HildeBus is titled as a motorhome in the state of Florida. As such, she is fully insured.
Read the blog on how we insured her in Florida and her coverage limits.
Interior floor plan
Kitchen
To this day, I’m obsessed by our beautiful and functional kitchen space. I go into more detail on our
Features of our kitchen:
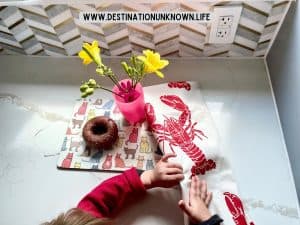
- Quartzite counters in light gray and white
- Custom solid wood cabinets in gray-blue
- Breakfast bar seating with storage
- Vertical deep pantry storage with bread storage on top
- Retro-looking appliances by Unique optimized for mobile dwelling
- Fridge is powered by 12V
- Range uses liquid propane gas
- Single-basin stainless steel sink
- Chef-style faucet, which doubles as an outdoor shower
- Marble and gold tile backsplash
- Cedar accents
- Vinyl (not wood) window sills to limit bacteria growth
Living room
The couch is 7 feet long, which is great for a big family. It features deep storage underneath and can pull out to be a twin sized bed. The cushions are 4 inch upholstery grade foam. The couch has been installed with car seat mounting brackets as you can read in this blog.
Attached to the couch (front of the bus) is a shoe storage space inlaid with antique heart of pine.
The two captains chairs are black leather on a swivel base and can be reclined.
We installed a liquid propane Dickinson marine heater with chimney between the two captains chairs, as a focal point.
Above the driver’s chair (front of bus), we installed bookshelves and a horizontal cabinet for additional storage. We also built a dash board with two cupholders.
Though the switches remain on the dash to the left of the driver’s chair, they do not work as that electrical was demolished in this vlog.
One of two ceiling-mount vent fans are located here. This one has a rain sensor.
Front door
We installed a full tempered glass door from Home Depot. It includes built in shutters and provides fantastic visibility when driving.
The door offers keyless entry with a Kwikset Smartkey Keypad. You can easily assign multiple codes, easily change the door lock, and set it up to automatically lock.
Bunk bed cabin
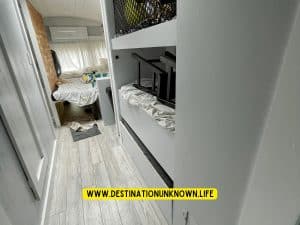
We built 2 fixed bunk beds and 1 pull-out bunk bed over the wheel well in the middle of the bus. Additionally, we built a little nook with door to the right of the pull-out bunk. The kids love this for toy storage.
The custom cushions are 3 inch upholstery foam.
The bunks are built for a younger family. The stationary bunks are about 5 feet long and 3 feet wide. The lower bunk is about 4 feet long and 3 feet wide. If you had a child larger than this, we recommend they sleep on the pull-out couch in the living room.
The fixed bunk beds have 12V lights and flexible nets, which are great when the kids are sleeping or for storage when driving. The top bunk also has a narrow shelf for storage.
There is a manual 12V vent fan in the ceiling.
The window is one of two emergency exit windows (the other is in the bathroom).
Electrical Solar closet
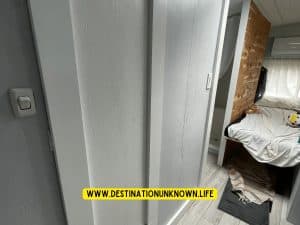
This closet is located in the same corridor as the bunk bed cabinet, and includes all electrical and solar coming into the bus, such as electrical panel and lithium batteries.
Captain’s Quarters (Rear bedroom)
The bed frame houses the fresh water tank, pump and accumulator. There is storage in the rear of the bed frame and a built-in end-table above the pump house.
When you want to change the bed from a daybed set up, it converts into a full-size bed. You’ll slide the top piece of the bed towards the cedar wall where it locks into place on a french cleat.
The custom cushions are 4 inch upholstery foam.
Custom cabinetry has been installed above the bed as well as in the closet located at the rear of the bus. The AC handler and ventless hot water heater are installed on this back wall.
The rear door can be opened. It can be best secured with a padlock on the exterior.
There is a roughly 2 foot by 2 foot skylight in this cabinet, which lets in natural light when the curtains are otherwise shuttered for privacy.
Bathroom
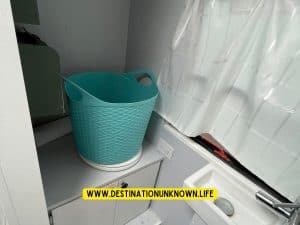
We installed a composting toilet, sink, light fixture above the sink and shower with bench seating. There is built in storage in the area next to the toilet.
The window is one of two emergency exit windows (the other is in the bunk bed cabin).
Composting toilet
Our system is a 5 gallon bucket with plastic bag, coconut coir for the solids and a urine diverter to the gray tank for liquids.
Shower
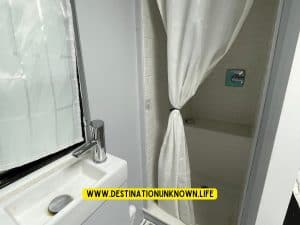
After Eric framed the shower and bench, he installed cement board for the walls and a 2 foot by 2 foot shower pan for the base.
Read the blog on how we built our skoolie shower here.
Insulation Specifications
- Closed cell spray foam throughout walls and ceiling. See vlog on that installation and this vlog on clean up.
- Ceramic automotive insulation on framing where it comes in place with the metal frame. See vlog on that installation.
- Rigid foam in the floor
- We kept the original windows, but we resealed them all in 2021.
Upgrades to limit rot and mold (reduce thermal bridge)
- Vinyl (not wood) window sills.
- Cedar accent walls in living room (couch), kitchen (by vertical cabinet), and captain’s quarters (feature wall).
- Ceramic automotive insulation on framing where it comes in place with the metal frame. See vlog on that installation.
Safety features
- Smoke & carbon monoxide detector (installed in sleeping cabin)
- Propane gas detector (installed in sleeping cabin)
- Fire extinguisher (in solar cabinet)
- Two emergency exit windows (bathroom and bunk bed cabin)
- Rear and front doors work
- Three Car-seat mounting brackets (read blog on car seat installation)
- Seatbelts for the two captain’s chairs
- Bungee cords to secure kitchen cabinets while driving
- Bungee nets to secure items in bunks while driving
Paint & Accents
In February and March 2021, Ingrid spent many hours prepping the exterior of the bus for paint. We removed all vinyl decals with a rubber wheel and reflective tape with a heat gun followed by lots of goo-gone and acetone.
Additional interior & exterior paint cans can be found in the storage bins below the bus for touch-ups as needed.
Body Paint
We choose a tintable oil-based product for automotive usage from Lowe’s. It’s similar to Rustoleum, but allowing for color variation.
We further prepped the exterior for paint by sanding and washing with a heavy duty cleaner (link product on Amazon).
After that, following the paint manufacturer guidelines, we applied a primer coat then two top coats of the colors we chose.
We chose white for the window area and dark blue for the lower part of the body. It matched our house and car – we apparently like this color combination a lot.
Vinyl Wrap
In June 2021, we teamed up with Media 1 Wrap This for our custom vinyl wrap on the exterior of our tiny home. Admittedly, a new owner may not want our brand on the bus, so I would recommend speaking with them on the best ways to remove the wrap if you want to.
Watch the wrap process by Media 1 Wrap This in vlog.
Roof Paint
In February 2021, the bus roof was lightly sanded then scrubbed with a heavy duty cleaner (link product- evergreen). It was caulked and painted using Tropicool products (bright white) recommended for high heat and sun conditions that we experience in Florida.
We used this Henry’s Tropicool product on Amazon and it has a lifetime warranty; however, we do recommend servicing and cleaning your roof and panels at least once a year to assess for leaks. It costs over $500 for a 55 gallon bucket.
The resulting finish is slightly tacky and grippy, which is nice if you have to service the panels on the roof.
Interior Paint
In July 2021, we hired a professional painter to spray the interior. We used low VOC paint purchased at Lowe’s in a semi-gloss finish, to allow for easy clean up.
We choose a limited color palette for the interior:
- flat white for the ceiling
- blue-gray for the walls
- bright white white for the baseboards
Frequently Asked Questions
- Windows: The windows that remain are original. They were caulked and sealed in February 2021, prior to painting the exterior. See how we deleted our windows in this vlog.
- Could a top bunk be removed? Yes, you could remove the top frame and give yourself more headroom on the bottom bunk.
- Will the solar power the AC? No, you will need to plug into the grid in order to run the AC or use the two portable generators in tandem.
- How much storage do you have on the exterior? We have 3 under-mounted storage bins that came from the manufacturer. One of the 3 bins goes back quite deep so it’s almost like a 4th bin.
- Could I remove the compost toilet and replace with an all-in-one toilet like the Nature’s Head? Yes, simple pull out the frame and replace it with the toilet you want.
- Is the bus being sold in As-Is conditions and furnished? Yes. Our intention is to sell the bus in As-Is condition with all fixtures, generators, water filters, and furnishings (curtains, shades, tableware, small appliances [InstaPot]), dry food storage containers, included.
- Did your bus have extensive rust? No, probably because it comes from an area that doesn’t experience much snow. We treated our minor areas of rust as recommended (wire brush, Rustoleum spray paint). See that vlog here.
- How did you frame the interior of the bus? Check out this vlog (walls) and this vlog (ceiling).
- What size fresh water tank did you install? 100 gallons. Read this blog.
- What size gray water tank did you install? 100 gallons. Read this blog.
- How do you refill your propane tanks? There are securely mounted with releasable brackets in a storage bin on the right exterior of the bus (under the kitchen window). You close the valves, disconnect the hoses, and take to a center that will refill (some gas stations, RV parks, boat yards, and campgrounds offer refill stations).
Go back to the Table of Contents!
Conclusion
Thanks for following our journey. – Ingrid & the HildeFam
